Showing posts with label CAS. Show all posts

Wednesday, August 11, 2021

My niece is turning 4!

 So, one of my nieces is turning 4 in a couple of weeks.  She is such a cutie-patootie!  She is a spitfire combination of "girly girl" who loves hair bows, horses, & mermaids and "tomboy" who romps around playing in the dirt with her brothers and dogs!


Here is the card that I made for her.


I followed a recent YouTube tutorial from Sam Calcott, Mixed Up Crafts, where she made several cards using up scraps. As soon as I saw Sam's Happy Birthday candles card, I knew I wanted to CASE it for my niece.  This was definitely a Clean and Simple (CAS) card that came together quickly. It took me longer to select the scraps than it did to actually complete the card!   It was so very satisfying to use up small pieces of patterned paper.

Most of the scraps are pattern papers from Fun Stampers Journey and a couple are from Stampin' Up!  I cut the scraps 1/2" wide by however long the scrap was.  I laid them out along the front until I was happy with the layout.  Before gluing them down, though, I stamped the sentiment with Ranger Archival black ink.  That way, I knew how much room I needed to leave in order to color in the candle flames. After gluing down the scraps, I cut off the paper that was hanging off the bottom of the card. It's not visible in the picture, but I colored over the flames and the sentiment with a clear glitter pen.

The finished size of this card is 5x7.


Friday, October 18, 2019

Card Shower Request


I belong to a Facebook group called Random Acts of Cardness where we send cards out when a request for a card shower is posted.  Yesterday, I saw a post for a veteran who has been hospitalized for several weeks and is need of a “pick me up.”  It was late when I saw the request so I didn’t have time to make a card, but I did find one in my stash to send.


I’ve had this card for quite a while, so I’m glad I finally found a reason to send it out. I remember some of the details, so I’ll post as much info as I can.

The airplane stamp is from Prickly Pear – I stamped it in black permanent ink on white cardstock. I used markers to color the image, then fussy cut it out.   I do not know the brand of the tree stamp, but it is similar to one of the stamps in Stampin’ Up’s retired set, Lovely as a Tree. I stamped the trees with Stazon ink onto glossy cardstock. After the ink dried, I sponged around the trees with blue ink to create the sky – this gave the illusion of clouds. I sponged green ink along the ground to create the landscape.

The card front is 5-1/4” x 4” and is layered onto a piece of black cardstock measuring 5-3/8” x 4-18”.  The size of the finished card is A2, 5-1/2” x 4-1/4”.

Thursday, October 10, 2019

Not a Card I Wanted to make This Week


This is so not the kind of card I wanted to make this week.

Unfortunately, we had an unexpected death in our family earlier this week. And, of course, I didn’t have an appropriate sympathy card in my stash ready to go. Pinterest to the rescue for inspiration!

Here is the card that I made:


I inked one side of a Spellbinders double-sided embossing folder before laying down the designer paper & running it through my embossing machine to create the background texture.  The designer paper is retired and is from Stampin Up.  The sentiment was stamped with Stampin’ Up’s Basic Gray ink on a scrap of white cardstock, then run through my die cutter to cut out the shape.  

I laid a piece of lace across the front, then glued the sentiment on top. I layered the card front onto a slightly larger piece of designer paper  (the flip side of the green), then glued that onto my white 5”x 7” card base.

IMPORTANT - please read!
If you are struggling with thoughts of suicide, PLEASE!!!  Get help or reach out to someone, anyone! If you have no one to whom you can talk or confide in, please call the Suicide Prevention Line at 1-800-273-8255!  Suicide is never the answer. 

Tuesday, August 23, 2016

Die Embossing and Rock 'n Roll Tecnhiques

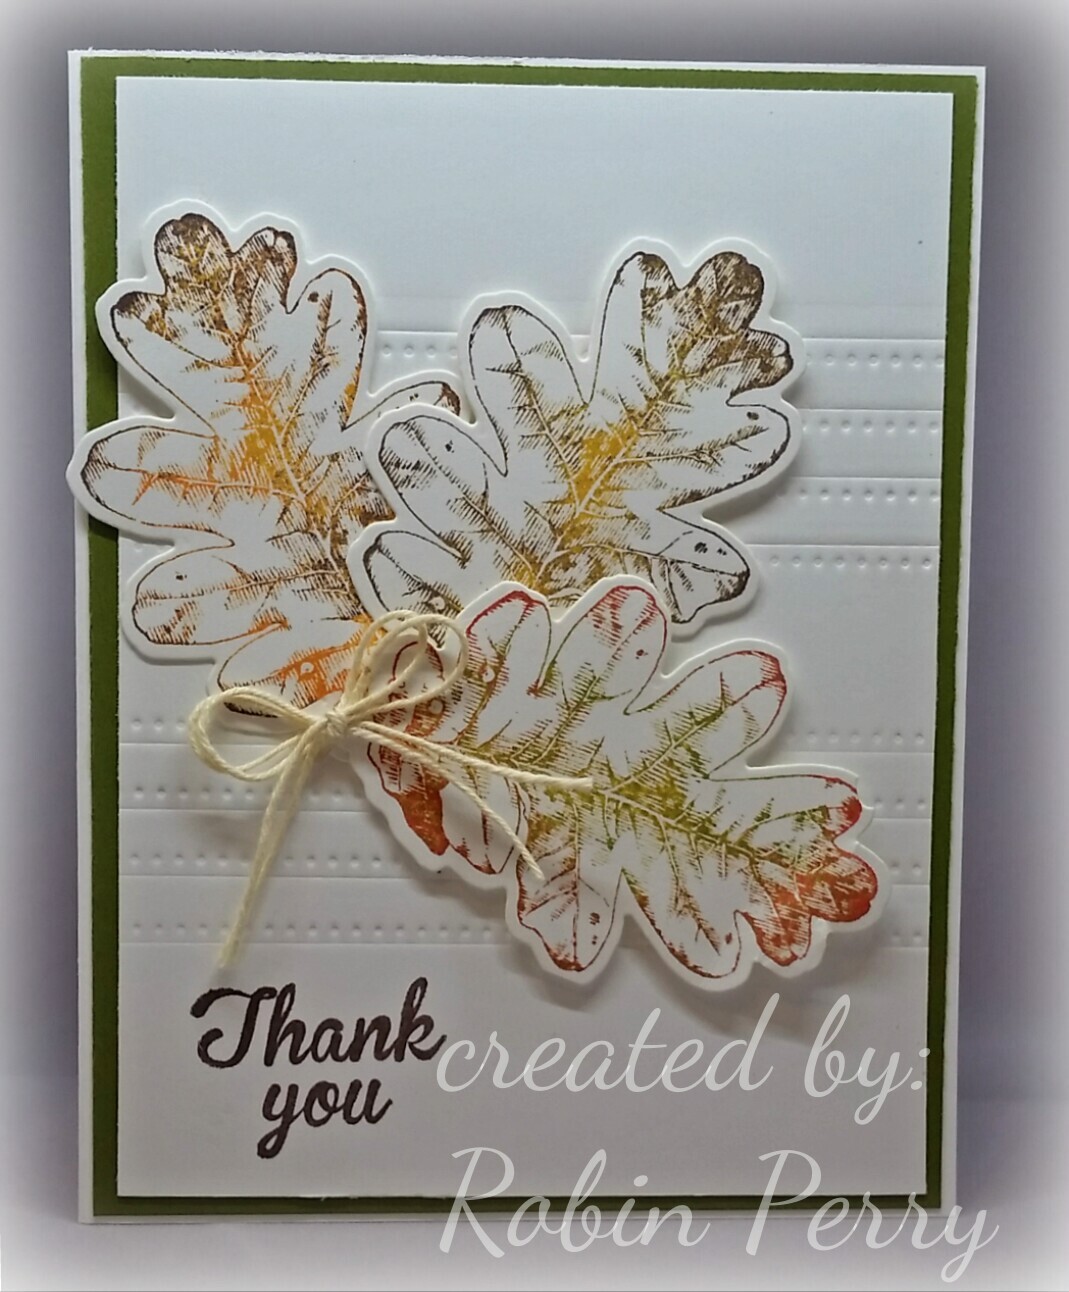
I watched a video by Jennifer McGuire where she highlighted the “Die Embossing” technique with layering dies.  I was fascinated and ran to my art studio to give it a try with my Fun Stampers Journey dies. This is the end result of my studio play time!


I don’t have the circle or oval dies (yet!), but I do have the rectangle and long rectangle piercing die sets.  I decided to use the long rectangle dies, so I laid them out & placed a few pieces of scotch tape on the non-cutting side to hold them together.

It took a few tries to get the right sandwich combination for my Grand Caliber die cutting machine. This is what works in my machine (bottom to top): Base Plate, Tan Embossing Mat, Cardstock, Taped-together Dies (cutting side down), Adapter Plate & a shim that was cut from a manila folder.   It didn’t feel tight when it was rolled through my machine, but the embossing came out beautifully.

Now that I had an embossed piece of cardstock, I had to decide what I was going to do with it. I thumbed through my Fun Stampers Journey stamp sets looking for the perfect set to work with my embossed piece.  Ah ha!  I have matching dies for the Autumn Days (SS-0006) set.

 I used Fun Stamper’s Journey Pineapple Smoothie ink on the oak leaf stamp, then “rock ‘n rolled” the following colors on top of the Pineapple Smoothie ink: Green Olive, Rich Coral, and Dark Roast to get the variegated colors.  I used the matching dies to cut the leaves out – so much faster than fussy cutting!

The bottom leaf is glued down flat at the stem end & the top of the leaf is popped up; I placed the tape close to the edge of the image. The second leaf has more tape toward the top so that it pops up more than the bottom leaf.  The leaf on top has tape all over it and a double layer of tape at the top for extra dimension.

The sentiment came from the Summer Garden (SS-0078) set and was stamped in Dark Roast ink. The panel was glued onto a piece of Green Olive cardstock and that panel was glued onto a Whipped Cream card base.  I tied a length of twine into a double bow & used a glue dot to adhere it to the card front.

Tuesday, July 26, 2016

Fun Stamper's Journey, "Tickled Pink"

This card is for this week’s Try a New Technique Challenge on Splitcoaststampers.com.  The challenge was to create a  “Bordered Sentiment” card.  I have been seeing quite a few cards with flamingos lately & they have been “growing on me.”  So, I decided to use Fun Stamper’s Journey Tickled Pink set for the card.


Here is the finished card


After stamping the sentiment onto a piece of Fun Stamper’s Journey  Whip Cream cardstock, I drew the border lightly with a #2 pencil & masked it off using blue painter’s tape.  I stamped the flamingo first & colored it.  I masked the image before stamping the tree trunk & palm fronds.   I drew the coconuts using different colored markers to add shading.  Once that was done, I colored in the palm fronds and tree trunk.  

Once that was done, I carefully peeled off the painter’s tape & stamped the three flowers & leaves on the right side above the sentiment.  Then I went over the pencil marks with a marker to create the border & erased the remaining marks that were inside the flower petals.   I water colored the sand and sky with marker ink & my watercolor pen.

Ugh, I did not like this card after all that work!  The left side of the bordered area was empty and I didn’t like how the flowers looked.  So, I stamped five more flowers & eight leaves on a piece of scrap cardstock, water colored them, then fussy cut them out. After that was done, I glued them onto the card & added a bit of glimmer to the yellow centers & sentiment using Sakura gold & clear glitter pens.

When I was happy with the card front, I trimmed it down to 4” x 5-1/4”. I layered it on top of a piece of Sweet Berry cardstock that was cut to 4-1/8” x 5-3/8” and glued that entire piece onto a card base of Black Licorice cardstock.  (8-1/2” x 5-1/2”, scored at 4-1/4” to create the base).

You can purchase the cardstocks and Tickled Pink (SS-0265) stamp set on my Fun Stamper’s Journey page, 


Tuesday, March 8, 2016

MMTPT398


This is my card for today's Teapot Tuesday challenge on Spltcoaststampers,com. This week, our cards are going out to Mrs, Utterback in Alderson, WV.  Mrs. Utterback will be celebrating her 103rd  birthday soon!

I apologize for the brevity of today's post ... I am going to type the recipe for rhe card and leave this post at that.

Recipe:

Cardstock - Fun Stamper's Journey
Ink - Stazon black, Memories sand
Stamps - Cornish Heritage Farms (poppy), Fiskars (jar & frame around sentiment), Verve (sentiment)
Accessories - woodgrain embossing folder, blue sharpie pen (water in jar), Prismacolor pencils, scrap piece of clear plastic packaging material

Wednesday, March 2, 2016

MMTPT397


This is my card for this week’s Teapot TuesdayChallenge.  This week, our cards are going out to a Sister-SCS’er, Cheryl (cherylquilts).  The theme of this week’s challenge is “threads, pins, needles, patches.”  I took some creative license and expanded that into quilting since, according to Cheryl’s username, she is a quilter.  

Since I am in the middle of reorganizing my art studio (and it is a disaster area right now!), I wanted to keep to a simple card that didn’t require dragging out a lot of supplies.  While cleaning out my paper scraps earlier this week, I ran across a 6x6 pad of Basic Gray “Out of Print” designer paper that I had forgotten about.  The flowered sheet is perfect for a quilted motif – all I had to do was emboss it with my We R Memory Keepers 3D embossing folder. The black border is also from the same Basic Gray paper pad, so of course, it coordinates perfectly with the flowered paper.     Easy Peasy!


I had strips of both papers left over, so I used a border punch along the black piece. I flipped the flowered piece over and stamped on the white side. (I apologize, but I do not know what company the stamp is from.) I then glued the two pieces together, trimmed them to size, used my clear glitter pen over the sentiment, and popped up the piece with 3M mounting tape.  I found the Lindy’s Stamp Gang brass butterfly charm while cleaning and had set it on my desk.  Turns out that it was perfect for this card so I used teensy pieces of 3M mounting tape on the back & attached it to the card.

The card base is Fun Stamper’s Journey white cardstock and I used Archival Black ink.

Wednesday, February 24, 2016

Butterfly card


This is a card from my stash; I am sending it out in response to a card drive request on Splitcoaststampers.com.  I don’t remember much of the details but I wanted to share it because I haven’t posted anything for a few days.

The butterfly is a Joy Craft die and is available from Frantic Stampers   .  The image is Carved Damask (Product # [AT-0075]) from Fun Stamper’s Journey; you can order this stamp through my FSJ website.  It was stamped then heat embossed.  The image was cut with Spellbinders Label One and matted with a decorative Labels One.  I do not know the brand of the designer paper or the name of the collection that it is from.

Friday, February 19, 2016

Masculine Thinking of You


This is definitely a Clean And Simple (CAS) card!  And it was fairly quick, too.  I “copied and shared everything”  (CASE) This Card found on Stamp & Create With Sabrina .  I love the elegance of her card and I also like that it can be used for other occasions.

I used Fun Stamper’s Journey  Butter Cream cardstock for the base and all layers, so this card is very heavy  (just how I like them!).  I didn’t measure the image panel, but it looks like it is about 3” x 4”.  If you are CASE’ing my card, you might want to cut it a little larger & then trim as necessary.  


 The image comes from Technique Tuesday’s Greenhouse set; it is dated 2012 so it might not be available any longer.  I used Momento cat’s eye pads in Olive Grove for the stems and Rich Cocoa for the pod.  The sentiment is from Stampin’ Up Wetlands set and I used Fun Stamper’s Journey Black Licorice ink for it.  I then used a clear glitter pen over the word “Thinking” only.

I used Stampin’ Up Square Lattice embossing folder for the embossed layer. It was cut at 4-1/8 x 5-3/8, embossed, then trimmed to fit the card with an even border.   I used a piece of fun foam to pop up the image layer.  The solid backing from the fun foam will insure that the card will go through the mail and not be crushed.  

Monday, February 15, 2016

White Pencil Highlighting


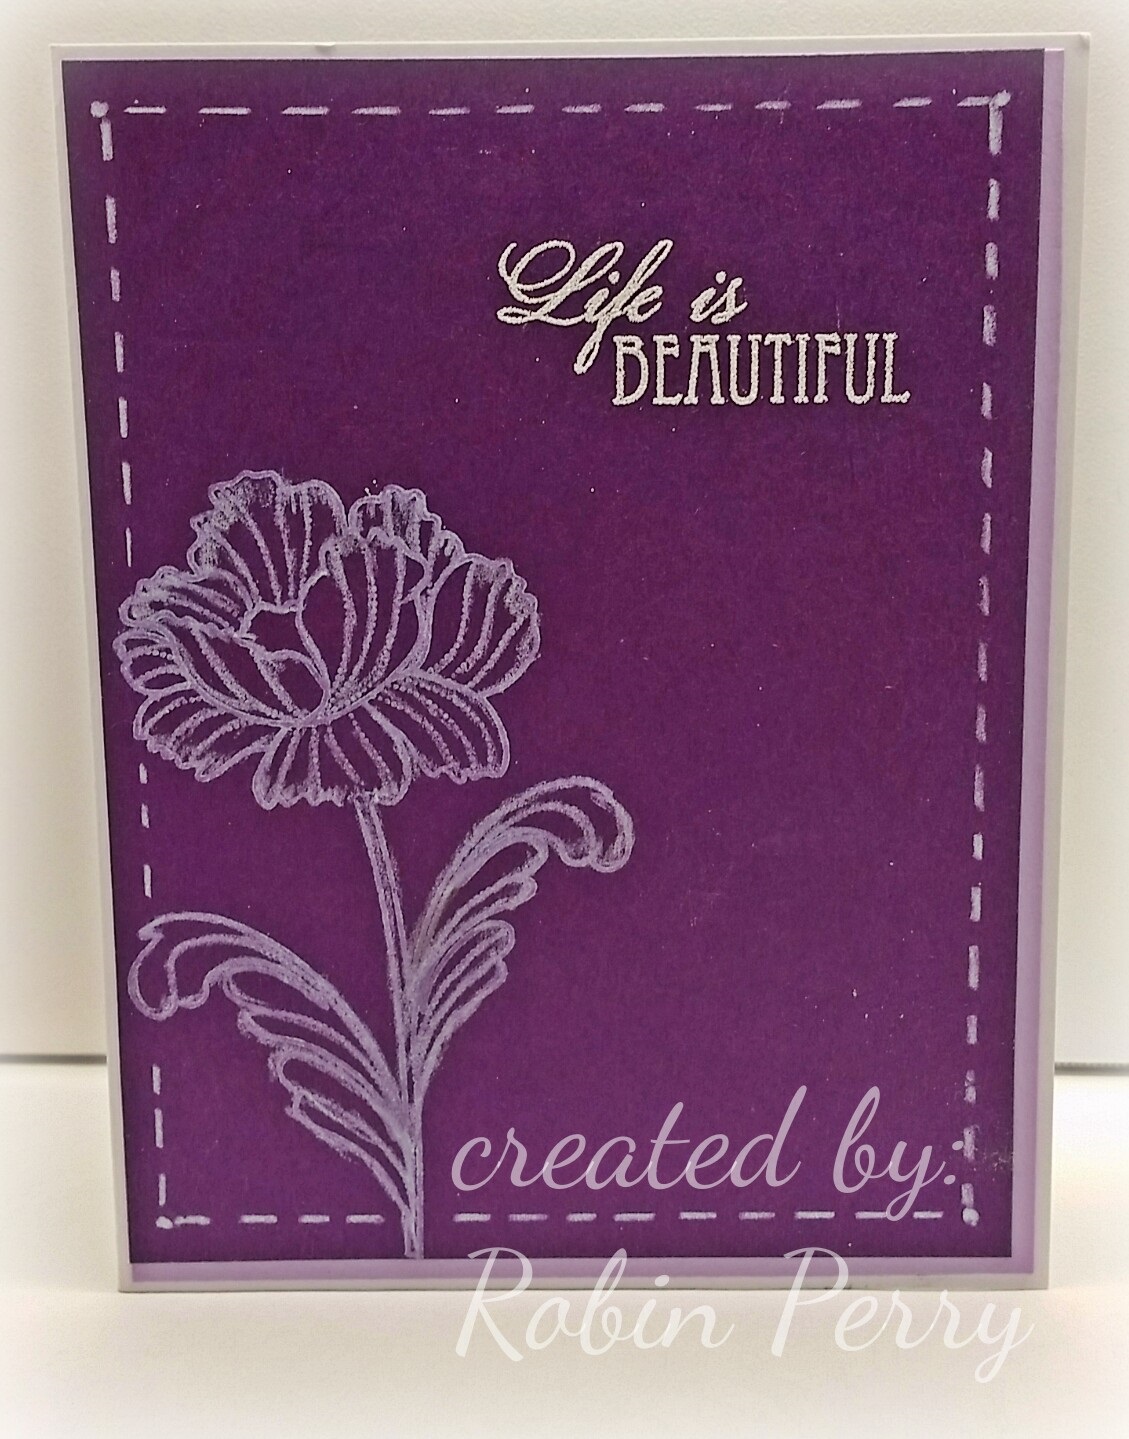
I have been wanting to try Jennifer McGuire’s White Pencil Highlighting technique  ever since watching her video from Feb 5th.    I needed a card for a friend’s mother, so I finally decided to try it last night.

My first attempt was not good at all, so it ended up in the trash.  It was so bad that I didn’t want to take a pic!  I used a floral background stamp, white pigment ink, and a white stabilo pencil; the details of the stamp got lost and it ended up looking like a mess of white lines.  Yuck!

I looked through my floral stamps and finally settled on an image from Penny Black’s Petal Party stamp set.  And! I was doing the Happy Dance after I found a white Prismacolor pencil in with all my other colored pencils!   I used Colorbox white pigment ink for the image and stamped it on the left side of the Fun Stamper’s Journey Pretty Pansy cardstock. I followed Jennifer’s instructions on using with the white pencil to feather and soften the ink. I liked this one sooo much better than the first one! 

I stamped one of the sentiments from the same stamp set with Versamark ink then heat embossed it with detail white embossing powder.  Then, I decided it was too stark and plain so I thought I would use Fun Stamper’s Journey Pretty Amethyst cardstock to layer underneath the image.   I decided to do something different and lay the front so that only the right side and bottom edges of the Pretty Amethyst cardstock was showing.

Oh. My Goodness!  This card is just not making me happy at this point.  I like CAS (clean and simple) cards, but this one was far too CAS.  It also almost ended up in the trash can!  Since this card really needed some help (and fast!), I figured that making a frame around it with the white pencil couldn’t hurt. 

Eureka!  THAT was what the card needed!  It makes me smile now, and I sure do hope it will put a smile on my friend’s mother, too!   

Tuesday, February 9, 2016

MMTPT394 Butterflies for Carolyn

https://www.pinterest.com/pin/24910604167734606/


This is my card for today’s  Teapot Tuesday  challenge at Splitcoaststampers.com.  This week, our cards are going out to Carolyn in Douglass, KY.

My card is a very loose CASE of  this card    that I found on Pinterest.  Since my card is very different, it is probably more accurate to say that I was inspired by Hansi's card rather than call mine a CASE (copy and share everything).  Oh well!

I used Papertrey Ink dies to cut the flourishes and Memory Box dies for the butterflies. The sentiment is from  Simon Says Stamps set  #SRHA15.  I used a clear glitter pen over the sentiment and the butterfly antennas.

Wednesday, February 3, 2016

Hand Drawn Poppy

Hand drawn and watercolored poppues

Last night, I doodled this poppy and bud while talking on the phone.  The doodle turned out nice, so I decided to color it with my Zig watercolor markers.  The worst that could happen was that I messed it up so, if nothing else, it would be good practice.  In the end, I was happy with the results! 


After I colored the flower, bud, & stems, I thought it looked a bit bare and needed a leaf.  Well! Instead of looking at some poppy stamps that I have to verify what the leaves actually look like, I decided to cut a stencil using a Heartfelt Creations leaf die.  Rather than of tracing inside the negative space of the stencil, I traced around the actual die cut so the leaf ended up being too fat.  Then, when I colored it with the Zig markers, it got worse!  Oh well, practice makes perfect!   Once the leaf was semi-acceptable, I decided  to stop messing with it! 

I used a black charcoal pencil to draw a line around the image then smeared it a bit with my finger to give the image some depth. After erasing away some of the extra smudges, I sprayed the whole piece lightly with hair spray to set the colors.

After the hair spray was dry, I used my MISTI stamp positioner for the sentiment.  It’s a good thing I did because I had to stamp the sentiment twice to get a good impression.  I then went over it with a clear glitter pen to give it a bit of sparkle.